How to connect domain email to Gmail account

When we start a website, whether it is a personal website or business website, we do also add a custom email address for that domain. Using Gmail accounts for the domain is not considered as a good practice in case we are running a business (small or large). However, we check our Gmail accounts on a daily basis as this is our basic mail account. Handling multiple mails is such a very hard task for a person, so why not merge them all? In this article, I will explain How to connect domain mails to Gmail. A complete process telling – how to connect a custom email or domain email address to the Gmail account.
A guide to send & receive domain mails by Gmail
To use our custom email account or domain email account, we have to open a custom email address like mail.example.com or webmail.example.com URL. Otherwise, we have to access the hosting account cPanel and log in to the email account. Another way to access our domain mails is to configure them with any desktop software like MS Outlook with our email accounts. All of these methods take a lot of time. Using software sometimes face some problems too. The best option is to connect your domain emails to your Gmail account. That is why I am telling you the method by which you can connect you with a custom email with the Gmail account.
The POP3 in Gmail account
Gmail by Google is the most popular email service, and fame is because of the features in Gmail. It has a wide variety of important and useful features apart from sending and receiving emails. You can directly access your email account mymail@example.com from the Gmail account using POP3. After this, you can see the mail coming to your domain email address directly to your Gmail inbox.
With the POP3 functionality of Gmail, you can send an email and receive emails via Gmail AS your custom email address. If you do not have a domain mail, you can setup from the hosting account or cPanel of your website.
Step by Step guide to connect domain email to Gmail account
Let’s start configuring the step by step guide to connect domain email with the Gmail account. Below are the steps along with the screenshots to guide you better from my side. If you will be left with any more queries in your mind, do ask in the comments section.
How to add Domain Email/ Custom Email to Gmail Account
This information is very useful for website owners so that you can handle the self-created email account through Gmail. For this, you just have to follow a few simple steps in Gmail settings. The process may be a little longer to see, but don’t worry, when you will do it, It will take a few minutes only.
Access Email with Gmail Account:
Login to your Gmail account, and click on the settings icon on the left corner of the page.
Now click on the Settings option in the dropdown menu.
Settings page will appear. Click on the Accounts and Import menu.
Now click on Import mail and contacts option in front of Import mail and contacts option. This will open a Popup window.
Enter here the email address you want to connect. It will check your address for a while and then ask for the password, POP username, and POP server.
For example password = “mysecretpassword”, POP username = uname@mydomain.com, POP server = mail.mydomain.com
If you have an SSL certificate, then enable Use SSL or leave it disabled.
Fill the options correctly and click on continue. As you get verified, you will be asked for a few more options as I am showing in the image below. Do keep the import option checked, you can opt for others by your choice. I recommend giving a proper label, like “Imported Mails”.
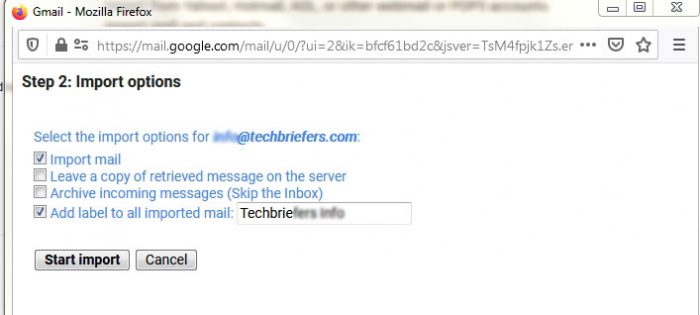
Domain email import requested
Now all the data of your custom/domain email account has been requested imported into the Gmail account. This process may take a few minutes to complete. If the messages of your custom email are not imported in Gmail, then wait for some time, it will be done in 1-2 days.
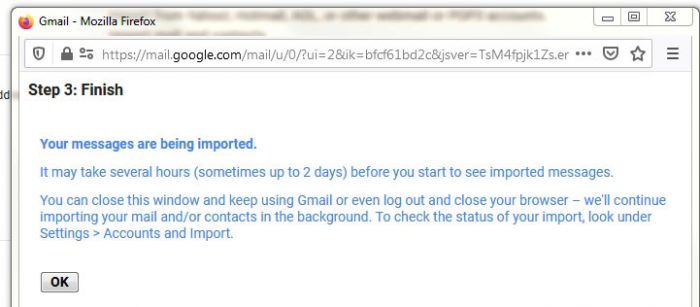
Now your domain mails have been added to the Gmail account. You just have to do one more setting, to receive and send mail so that you can receive and send mail through the Gmail account.
Now once again go to your Gmail account and click on the settings icon on the right side and click on the Settings option.
- Again, click on Accounts and Import in the top navigation menu.
- Click on Accounts and Import
- Now click on edit info in front of check mail from other accounts option.
Now a popup window will open, follow the steps below and configure.
- Enable the “Label incoming messages” option.
- Now add the password and click on Save Changes.
This will open a popup window again.
Configure domain mail in Gmail account
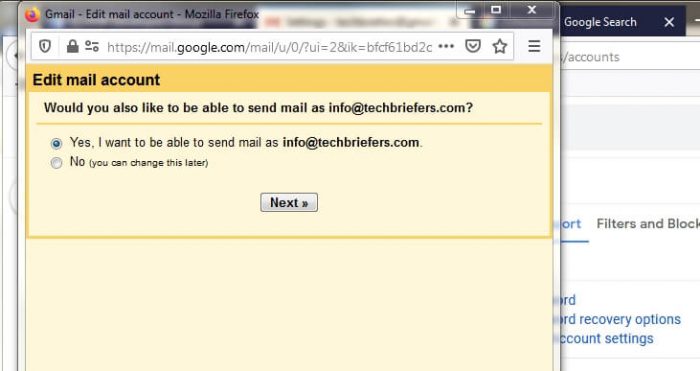
- Select the first option which is “Yes, I want to enable to send mail as name@yourdomain.com”. And click on Next.
- Now enter your Name and click on the “Next Step” option.
- In the Next window, add your username and enter the password.
- Then click on Add Account.
Now the process to allow incoming messages is complete. You just have to confirm the email address. For this, you have to go to the inbox of your domain/custom email account. And confirm your email address.
You can confirm the Gmail account in the way that you like the most. Here, I am telling you the process by using Gmail.
Steps to configure domain mail in Gmail
- Go to your Gmail inbox, there you will see a different category from the name of the custom email address or Label you created, in the left sidebar.
- Click on that category/ label
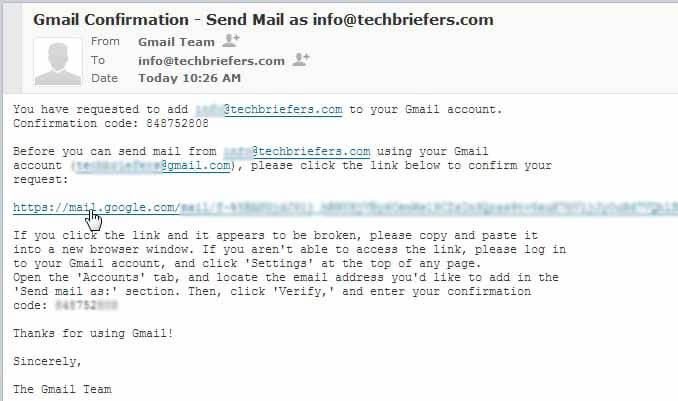
- Open the Gmail confirmation mail
- This mail contains a link to confirm the email. Click on that link.
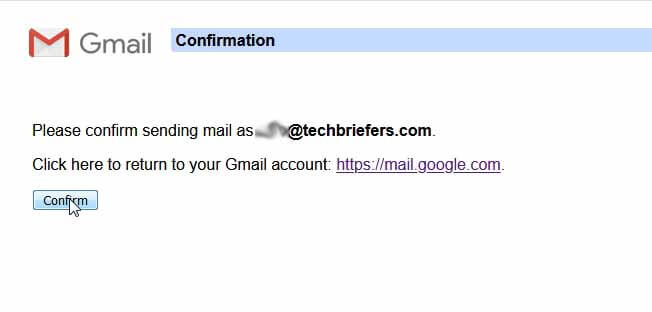
- You will see a window/page with the confirm button, click on that button.
Below are the steps to follow which allow the incoming of emails to your Gmail account.
Step by step Guide To Recieve domain mails in Gmail with pictures
After clicking on the edit option, the below image will open.
Enter the email Id and password and other credentials like above and save changes.
Check yes. If you do not want to check no and click the Next button.
In the picture above, Simple mention your name or the one you want to. and click on the Next Step button.
Do mention your username and password. The SMTP server will be entered by default, but you can change it accordingly. Choose TLS and if using SSL, use that. Click on the Add Account button.
This step will lead to a popup window which I haven’t shown here. It will ask you for confirmation code send in the mail, you need to click on the confirmation link sent in the email to your domain account mail. Close the popup and login to that account and click on the confirmation link.
Confirm mail to receive mails from domain mails in Gmail
This will take you to a page asking confirmation. Click on the Confirm button.
Confirmation Done.
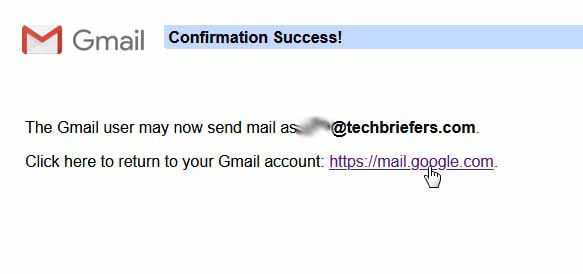
You have configured your mail successfully. Now all the mails from domain mail will come to Gmail. You can see confirmation mail t your Gmail which was sent to the domain email account.
Now if you have done all the process correctly then you will get a message of – Confirmation Success!
Congratulations! Now your domain email account has been completely connected to the Gmail account. And you can easily send and receive messages from custom email on Gmail account.
How to Send and Receive Message from Custom Email Address to Gmail Account?
After connecting the custom email address to the Gmail account, a question will definitely come in your mind that how do we send and receive mail from custom email on the Gmail account. Let me also tell you about it in detail.
#1 How to Receive Custom Email Mail in Gmail?
It is very easy that after accessing your email account from Gmail, an additional category will be created with the name of that email in the Gmail inbox. To get the massage of custom email, you go to Gmail inbox and click on the category of custom email in the left side sidebar.
Here you will see all the emails on your custom email.
- Go to the Gmail inbox and click on the category of custom email on the left side.
- Now here will be all the messages of your custom email account.
#2 How to Send Message from Custom Email Address in Gmail Account
Like receiving the same massage, it is also very easy when you send mail to someone, after clicking on Compose you will get 2 options in the “From” section.
One, for your primary Gmail account and the other for your custom email address. You can send mail by selecting any of the mails, you want to send from.
In this way, you can add your custom email address to the Gmail account and manage custom email through the Gmail account. Now you will not have the problem of repeatedly going to cPanel or custom email address and log in.
Final Words
Hopefully, you will like this post and you will get useful and helpful information in it. We have to visit hosting cPanel frequently to read massage in the custom email account and every time we have to sign in. If we connect domain email to the Gmail account, then we will get rid of this problem and also save our precious time.
Using custom email is important for website and blog owners but it is a bit difficult to manage it. Although you can manage a custom email account in windows mail software the method of Gmail is much better than that.
I have explained each step with screenshots. If you still have a problem then you can share your words in the comment section and find a solution.
If you like this article, then share it with your friends and other people on social media.




Leave a Reply